A Do-It-Yourself Turning Target System
by Edwin C. Hall (February 2002 - updated 22 August 2002)
Note: The ** NEW ** Do-it-Yourself Turning Target System is recommended instead of this older version. Although the newer one doesn't include building it on a tripod, it does allow for mounting it on one if desired. The newer one is less expensive and simpler to construct.

Background
I've designed a home made style turning target system which can be used for a single target or can be designed into a multiple target system. I build both on this framework. The unit is powered by a 12 volt 4 AH sealed lead acid rechargeable battery which will last for several hours of use. The system draws its short bursts of current (up to ~4A) only during the actual turning phases, a minimal amount (<100mA - depends on the relay used) while faced and none during edge time.
The heart of the turning system is a windshield wiper motor. The particular one used for this project is described as a 2000-2001 Saturn L motor. Other types may work, but this one started turning up at surplus places for around twenty dollars. This type of motor has good torque and an integral switching system which can be used to limit the travel in one direction. Therefore, only one more switch is needed to limit it in the other direction. I found that for this alternate direction I also needed to provide a stop due to the inertia of the motor (and target). The integral limiter stops the motor by reversing the polarity of the windings, but I didn't want to get that detailed in my construction of the other limit point. In the present design there is a relay which controls the direction of travel, the integral limiter for face position, and the added switch and bump stop for the edge position. The target does have a "bobble" at the end of its swing, but it turns in a relatively quick fashion and the "bobble" ends pretty soon. The turning time is well less than a second, but is dependent on the weight of the target or system of targets.
This target system was designed to be faced by a momentary contact device such as a switch or relay. Such a signal is provided by my Rangebox, a command playback and switching controller powered by a 9-volt battery.
I have built several of these, and decided to place this information into the public domain so others can build them. If I can provide a means for someone to afford a turning system, then I'm happy to have published this page. If help or more information is needed, contact me (15 Lakeview Ave, Tupper Lake, NY 12986).
A list of materials I use is at the end along with some source information. Many of the parts are common type items found at many hardware stores, but some are from other places. For some of the "others," I've also provided part numbers.
Of course, no printed instructions can be free of a safety reminder these days. Due to the inability of me to be by your side through this, you will need to assume all risk involved with the construction and/or use of this system. This includes, but is not limited to, the use of all tools involved.
Updates
Feel free to provide feedback on how this project has worked. I will try to change it if better parts appear or techniques evolve. I have reviewed this document countless times, but there is no guarantee of accuracy. If an error is found, I will attempt to immediately get the correction out. Please feel free to send me comments.
Construction
In an attempt to avoid confusion, I will refer to the motor and housing in the following manner:
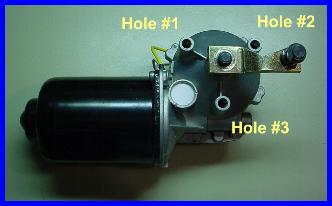
Orient the motor assembly such that it is sitting in front of you with the shaft at the upper right. This should place the motor horizontally to the lower left as in the picture. Where the black motor cover meets the grey housing, two wires emerge and travel to the back of the connector on the bottom of the housing. The mounting hole just above these wires will be referenced as #1. Moving clockwise, the next mounting hole is #2 and the last one is #3. The connections on the bottom of the unit will be referenced by the numbers given on the connector housing. In case you get a motor which has different markings, this can be a key: A=53b, B=53a, C=53e, D=31b and E=53. A-E will be from the left looking into the connector with it on the bottom and the shaft pointing upward. The lever arm mounted on the shaft will be referred to as the arm. This arm has a "hitch" type ball on the end. Its orientation at this point will not be important.
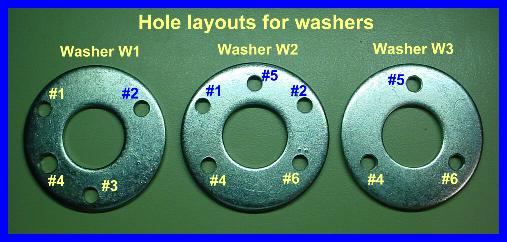
Holes drilled in the washers will be numbered to match with the numbering of the motor housing holes to start out. Subsequent holes made through the washers will be numbered as they are mentioned as referenced in the picture of the three washers. The large washers will be identified as W1, W2 and W3.
Steps to Construction - Working With the Motor and Washers
- Using a 13mm socket or wrench, remove the nut and lock washer from the shaft of the motor and tap the arm to loosen and remove it.
- Select the thinnest of the large washers (W1) and drill three 1/4" holes to coincide with the three mounting holes in the motor housing, with the washer centered about the shaft.
- Check for proper fit by trying to insert three M6 metric bolts through the holes in all three possible orientations and choose the one which best centers the washer. If the holes are close but not quite positioned well enough, you can enlarge them with the 17/64" bit. I like to slightly chamfer the holes with a countersink as well. Once you choose an orientation, mark holes #1 and #3.
Note: All of the 1/4" holes in this project can be enlarged slightly with the 17/64" bit to allow easier fitting of the parts. Depending on how precise your measurements and drilling techniques are, you may or may not wish to do this. Additionally, I prefer to remove all the rough edges from the holes by using a countersink cutter.
- Find a center point between the holes you marked (#1 and #3) for another hole, located 3/8" from the outside edge of the washer. This point does not have to be exact, but try to make it close. Drill this hole (#4) with the 1/4" bit.
- Loosely mount the washer to the housing and lightly place the arm back on the shaft. Move the arm to several points around its arc and check that it has clearance with the inside of the washer. If not, remove any metal from the arm that will restrict its movement. The points on the arm to check will be the two sharp corners and the two bottom edges of the first bend.
- Place one of the M6 x 50mm bolts through a plastic standoff and screw it into hole #2. Rotate the arm counterclockwise against this standoff. The arm should now be pointing almost in line but away from the motor.
- Mark the point on the arm where contact is made with the standoff and remove about half the width of the arm in a manner to allow the arm to move further counterclockwise against the standoff.
- Hold the arm with the hole to the left and the ball to the right (your cut should be facing upward). Remove the upper right corner by cutting it off at a 45 degree angle near where the ball mounts. This will give clearance for the 1/4" jack housing while in the edge position.
- Flatten the inside of the ball (toward the hole for the shaft) about 1/8" using a file or hacksaw. This will ensure clearance of the ball with the outside edge of washer W2.
- Smooth all rough edges on the arm. Recheck that the arm now has greater travel in a counterclockwise direction. The relief cut will allow for less beating of the system and help provide for a full 90 degree rotation of the shaft.
- Disassemble all the components and using washer W1 as a template, mark and drill 1/4" holes in the second washer (W2), corresponding to holes #1, #2 and #4 of washer W1.
- As you did with the first washer (W1) for holes #1 and #3, now find a center point between holes #1 and #2 of washer W2 for a hole (#5), located 3/8" from the outside edge of washer W2. Drill this hole with a 1/4" bit.
- Now I'm going to try to describe in a very confusing way, how to locate the position for hole #6 in washer W2. Basically, this hole will be directly across from hole #1 and 3/8" from the outside edge of the washer. To locate the position of hole #6, flip washer W1 upside down and place it on top of washer W2 so that hole #1 lines up with hole #2 for both holes. IOW, holes #1 and #2 of washer W1 now line up with holes #2 and #1 of washer W2, respectively. Mark washer W2 through hole #4 of washer W1. Drill this hole with a 1/4" bit.
- Using washer W2 as a template, mark and drill holes #4, #5 and #6 in washer W3 using a 1/4" bit.
Moving to the Bracket
- Orient the angled metal bracket so that it is on one side with the other side facing upward but away from you. This should look similar to laying a book sideways with its binding away from you and opening it up to have the cover upright on the side away from you. Measure 1-3/4" from the right edge (or 2-1/4" from the left) and make a line parallel with the left edge on the flat horizontal surface. Position washer W2 upside down over the line so that the line is centered through hole #5 and the center of the washer. Next, make a minor adjustment to align holes #4 and #6 evenly with the front edge of the bracket. Mark all five holes plus the very center of the hole in the middle of the washer. Drill the five outer holes with a 1/4" bit and the center hole with a 1-1/8" bimetal hole saw. Be careful with the holes near the edge. They may possibly break through and cause the bit to shift toward the edge. If necessary, form these two holes into slots with the round file.
Note: This next step is very important to the operation of the motor at the edge position. It can be very time consuming to get this correct, but do take the time.
- You must find the best mounting for the switch you've chosen to shut down the motor at the edge position. If this switch does not engage at all, the motor will try to keep running after hitting the stop. If it does not engage far enough ahead of the stop, the motor will bounce against the stop, possibly several times. To try to find the best place, do the following:
- Place the 1/4" x 3" bolt up through hole #4 in washer W1.
- Place washer W1 onto the housing in the correct orientation and screw the M6 x 12mm bolt into hole #3 finger tight.
- Place a plastic standoff and one 1/4" washer on the 3" bolt.
- Place washer W2 on the inside of the bracket in its proper orientation and insert a 1/4" x 2" bolt through hole #5 and another through hole #6 from the inside of the bracket. Place 1/4" nuts on these bolts and finger tighten.
- Place the arm and nut on the motor shaft and leave loose enough to rotate the arm.
- Position a standoff and 1/4" washer over holes #1 and #2. Position the bracket with the two bolts facing upward over the 3" bolt facing up from washer W1. Align holes #1 and #2 and screw the two M6 x 50mm bolts into place through the bracket, washer W2, 1/4" washer, plastic standoff, washer W1 and into the housing. Tighten everything finger tight. If needed, extra washers can be placed under the heads on the M6 bolts to allow tightening without bottoming out the bolts.
- You should now be able to move the arm through an arc of about 100 degrees. At its extreme counterclockwise motion, the switch must be fully engaged. Actually, well prior! Now you can calculate the positioning of the switch so that it is actuated at the earliest moment before the arm reaches its stop. Depending on the switch you've chosen, you may need to raise it off the surface as well as position it otherwise. The one I use is raised by using two nuts on each screw as spacers. Once you've determined the location, mark the holes, disassemble everything and drill the holes. Use an appropriate bit size for the screws you'll be using. I drilled oversize a bit to allow for final adjustment. I used a 1/8" bit for my holes.
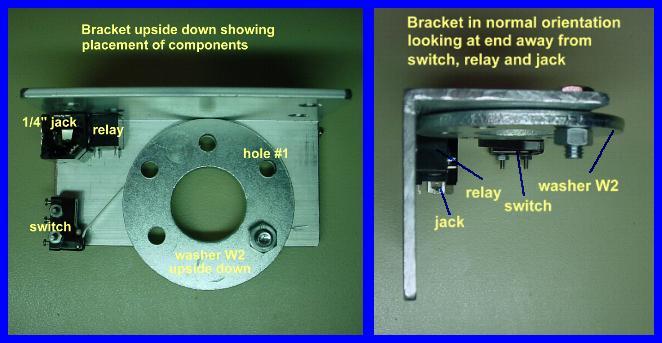
- Measure, mark and drill the hole to mount the 1/4" phone jack in the upper left corner of the bracket behind the holes for the switch. Leave enough room for the switch and be sure to clear the area where washer W2 will mount. Also leave enough space for the relay and for the arm tip when in the edge position.
Note: The next step is optional in that it is only necessary if you intend to mount the unit to a surface. In my portable tripod units I do have these holes and you can move the legs aside and mount the unit with these holes.
- Place the bracket on its opposite flat from the one you've been working, with a similar orientation to before. Now the part with all the current holes should be upright and away from you. Mark four holes for mounting: 1/2" up from the front edge by 1/2" in from the left edge, 1-3/8" up from the front edge by 1/2" in from the left edge, 1/2" up from the front edge by 1/2" in from the right edge and 1" up from the front edge by 1" in from the right edge. Drill these holes using the 1/4" bit.
- Loosely mount the switch to the bracket. Mount the 1/4" jack in its hole and using hot glue or epoxy, mount the relay to the back of the bracket. Mount it so it isn't interfering with any of the other hardware.
- Mount washer W1 to the housing using the M6 x 12mm bolt in hole #3. Mount washer W2 to the bracket using one of the 1/4" x 2" bolts (with nut) through hole #6 facing upward (away from housing). Mount the bracket to the housing using the two M6 x 50mm bolts through the bracket, washer W2, 1/4" washers, plastic standoffs and washer W1 using holes #1 and #2.
Some of the Wiring
- Now let's do some wiring! You can use some of the speaker wire from the 100 foot spool for these connections. You will only need about 80 feet to connect your target for 25 yard use. These connections will use less than five feet.
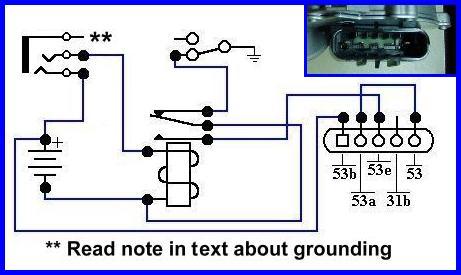
Note: The shield must not be attached to ground in any way. Either use a plastic jack with isolated mounting like the one in the parts list (preferred) or use the ring and tip of a stereo type jack AND plug. Even with a stereo jack, if the shield is grounded and a monaural plug is inserted, it will cause a short of the shield to ground. This will cause an overcurrent during the face operation.
- Bare the ends of a single lead about 2" long and crimp a 3/16" quick connect female terminal onto each end. Push these connectors onto pins 53 and 53a.
- Measure and cut another single lead piece to connect between pin 53e and the relay. Bare both ends and crimp a 3/16" quick connect female connector onto one end only. Push the crimp connector onto pin 53e and solder the other end to the Normally Open (NO) pin of the relay.
- Measure and cut a 3 "foot" piece of twin lead wire, bare all ends and solder the male coax cable connector onto one end such that the positive will be on the outside connection.
- Measure and cut a single lead to go between pin 53b and the shield pin of the 1/4" jack. Bare the ends of the wire and join one end with the positive lead from the battery connection. Crimp this junction with a 3/16" quick connect female terminal and connect to 53b. Solder the other end to the shield pin of the 1/4" jack
- Measure and cut a single lead to go between the tip pin of the 1/4" jack and the relay. Bare both ends and solder one end to the tip pin of the jack and the other end to one of the coil pins of the relay.
- Solder the negative battery wire to the opposite side of the relay coil and connect a jumper from this pin to the Common (C) connection of the relay.
- Measure and cut a single lead to go between the relay and the switch. Bare both ends and solder one end to the Normally Closed (NC) pin on the switch and solder the other end to the NC connection on the relay.
- Create a small lead to connect between the C terminal of the switch and one of its mounting screws. Solder this wire to the C terminal and connect it to one of the screws in a manner of your choosing. This connection is to ground the C pin to the bracket. You will need a good electrical connection through this screw. Don't use any insulating type washers.
Some Testing and Setting of the Stop Position
Note: The motor has a great deal of torque when it runs, especially when it starts. Hold the motor solidly or clamp it down for this testing phase. It may be easier to use clip leads for the following testing, but some short jumpers soldered to the remaining coax connector could be used.
- First, ensure that the arm is not on the shaft for these tests.
- Connect the negative lead to the battery. Briefly tap the positive lead to the positive terminal of the battery. The shaft should spin in a counterclockwise direction (looking from the top) each tap. If not, recheck your wiring. If it does spin correctly, connect the positive lead to the battery and the shaft should continue spinning.
- Test the switch by activating it several times. Each time you activate it the motor should stop.
- Now short the tip to the shield on the 1/4" jack. The shaft should turn in the opposite direction, but should stop on its own at some position. Break and make this short several times to get an idea of what is going on.
Note: This last step is very important!
- With the short still applied and the motor stopped in its own stop point, disconnect the battery.
Assembling the Main Section
Note: You must have the above stop point established when you mount the arm on the shaft the next time. If you're sure this is done, move to the next step. If you're not sure, hook everything up again and make sure.
- Clamp the 1/4"-20 to 3/8"-16 adapter into a vise and drill the 1/4" hole larger using the 17/64" bit. To try to achieve the best straightness to the hole I drill it through the 3/8" end. After you drill it out, tap it with the 8mm x 1.25 metric tap.
- Disassemble the washers from the housing and place a lock washer on the 1/4" x 3" bolt and place the bolt up through hole #4 of washer W1. Mount washer W1 to the housing using the 1/4" internal tooth lock washer on the M6 x 12mm bolt placed in hole #3. With holes #1 and #2 aligned with their corresponding mounting holes, tighten the 12mm bolt. The head of the bolt must be close enough to the washer that the arm does not hit it. If the bolt is too high with the lock washer in place, you may need to omit the lock washer and perhaps use some blue Loctite on this bolt.
- If you're sure the motor is in its clockwise stop point, place a small amount of red Loctite (#271) all around the contact area between the arm and the shaft and position the arm so that it is over the M6 x 12mm mounting bolt in hole #3. With the arm pointing at you, align the left edge of the arm even with the left edge of the bolt head. If there is some movement to set the arm onto the shaft (alignment of the small grooves from previous mountings), favor being clockwise just a little. (This placement can be adjusted to get close to an exact 90 degree turn, however, if the arm is placed too far clockwise it will beat against the standoff on bolt #4.) Place the original star washer on top of the arm and tighten down into place with the modified adapter. I do not use any Loctite on the threaded part of this shaft, but do ensure the adapter is tight, without stripping the threads, of course. Use the arm for leverage against turning the shaft when you tighten the adapter. Be sure to allow ample drying time for the Loctite before running the motor.
- Place a standoff and 1/4" flat washer on the 1/4" x 3" bolt in hole #4. Loosely mount washer W2 into its position on the bracket using the two 1/4" x 2" bolts up through the washer then bracket in holes #5 and #6. Use a lock washer under each head. Also place another lock washer and a nut on each to mount them to the bracket but leave them slightly loose. Insert the two M6 x 50mm bolts, with 1/4" lock washers under their heads, down through the bracket and washer W2 using holes #1 and #2. Place a 1/4" flat washer and a standoff on each and screw them down through washer W1 into their mounting holes in the housing. Add a lock washer and 1/4" nut to the 3" bolt. The three 1/4" washers should be on the washer W2 end of the plastic standoffs. Tighten all the fasteners. Set the unit aside.
Note: At this point you can mount the unit to an existing structure and use it as a stationary system for multiple targets. Simply use a 3/8"-16 bolt as the center post and connect whatever hardware will turn the targets. I recommend using a bearing with the bolt to relieve any sideways pressure on the bolt. In my multiple setup I have a smaller washer on top of washer W3 with a bearing mounted just under that top washer. In the illustration the board acts as the copper collar/tripod separator. To hold the bearing toward the top, if your support structure doesn't perform this task, you can use a coil spring around the bolt. Most hardware stores have a spring selection. For my local range where I use this setup, I built two swing arms mounted at the side walls. Each has three targets. This allows us to swing the turning targets out of the way when not in use.
Working With the Tripod
Note: The tripod I use has a center outside upright that just fits inside the large washers I use. Additionally, there is a ridge molded onto the shaft, which is about an inch from the bottom end. These features are why I chose this tripod. If your tripod does not have this ridge, you can place three screws equidistant around the center pole in its place. You still should work with a center pole of a close diameter to slightly over one inch to fit the inside hole of the large washers. The description in this project is for the type of tripod I use. You may need to do more or less work using a different one.
- Remove the crank assembly from the top brace.
- Unscrew the center outside shaft and remove any obstructions such as an end plug.
- Fully remove the inside shaft from the tripod.
- Remove the locking collar from inside the top brace and remove the locking knob and square nut that the locking knob used.
- Find the paperwork that came with your tripod (if bought new) and theorize whether the 5 Year Warranty Certificate is still valid. %^)
Note: In order to fit the copper collar over the bottom end of the shaft, you may need to open one end of the collar up slightly. I do this by pressing a 13/16" socket into the end of the collar enough to slightly open it. It shouldn't take much and often isn't necessary at all.
- Place the 1.2" copper collar over the bottom end of the center tube.
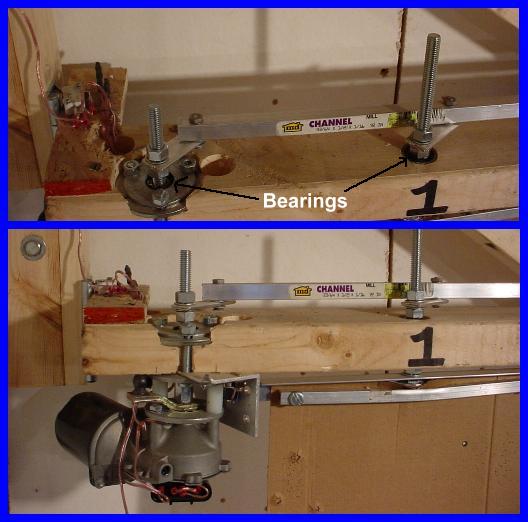
- Place washer W3 over the top end of the center tube.
- Place one of the bearings into the top brace where the tube threads into it and screw the tube back into place. This bearing may sit loose or tight; either is fine. Tighten the center shaft into place.
- Using a 3/32" bit, drill a small hole through the threaded area of the plastic top brace into the center tube to place a screw which will keep the center tube from turning back out. Use the screw removed from the crank mechanism for this hole.
- Place a small amount of blue Loctite (#242) on one end of the 3/8" threaded rod and screw it into the adapter mounted on the motor unit. You can use the wing nuts threaded back-to-back to tighten this rod into place. Remove the wing nuts.
- Drop the second bearing down over the rod and then insert the rod up through the center tube of the tripod (and the first bearing), positioning the copper collar in the 1-1/8" hole of the bracket. It should not fit through the center of washer W2. It should sit against it. Bring washer W3 down onto the three bolts. You may need to try all three positions of this washer to find the best lineup of bolts and holes. Add a lock washer and nut to each bolt. Tighten these evenly while aligning the bolts to rest centered between the support arms of the tripod when opened. Ensure the copper collar is positioned inside the hole of the bracket. Screw the 3/8" coupler onto the top end of the threaded rod and finger tighten against the top bearing. Set everything aside for a day to let the Loctite set.
Connecting Up the Battery
Building the Target Frame
- Retrieve the 1/8" x 3/4" by 2 foot bar aluminum and place two 90 degree twists in the bar about 4 inches out from the center. This will allow the center to sit flat and the ends to turn up to receive the channel metal.
- Drill a 5/16" hole in the very center of the bar. Tap the hole with the 3/8"-16 tap.
- Cut the channel aluminum in half and place one piece over each end of the bar aluminum in a right angle orientation. The bar should fit within the channel. Drill a hole through the channel and bar aluminum at each end of the bar to allow mounting the channel pieces. Use the 11/64" bit. Mount each end using an 8-32 screw and nut. When finished the target frame should be able to have a two foot wide piece of "backer" cardboard slipped into it between the pieces of channel aluminum.
- Place one 3/8"-16 wingnut, wings down, on the top of the threaded rod. Next place one of the 3/8" lock washers. Now thread on the target holder followed by the other lock washer and the other wing nut. Position the holder and tighten the wing nuts.
Making a Connecting Cable
- Strip both ends of the remainder of the 100 foot spool of speaker wire and install the 1/4" plugs connecting one lead to the tip and the other to the shield. Note: If the controller you are using has a different style connector, install the appropriate connector to that end of the cable.
Final Testing
- Connect the battery and whatever device will provide a signal to the 1/4" jack and test the system. The target should now turn relatively quickly. It may "bobble" a bit at each end of travel. You may need to adjust the switch to get the best edge condition. Be sure the motor stops at both positions. If a controller is not readily available, you should be able to activate the face position by shorting the connector at the controller end of the cable.
Tools and Materials List:
- countersink cutter (optional)
- 3/32" drill bit
- 1/8" drill bit
- 11/64" drill bit
- 1/4" drill bit
- 5/16" drill bit
- 17/64" drill bit
- 1-1/8" bimetal hole saw
- 8mm x 1.25 metric tap
- SAE 3/8"-16 tap
- 10mm socket or wrench
- 12mm socket or wrench
- 13mm socket or wrench
- 13/16" socket or other item to slightly enlarge the 1.2" collar
- drill - a press would be a definite advantage but a hand drill may work
- hacksaw
- vise
- round file
- soldering iron
- terminal crimpers
- hot glue or epoxy
- Loctite red (#271)
- Loctite blue (#242)
- solder
Parts List: (Source and P/N of part)
Note: Some of the parts I used for this project came from All Electronics. I am in no way affiliated with them other than being a customer. There are several other sources for many of these parts or similar. I provided this list with All Electronic part numbers solely for your information. Feel free to use alternate vendors. For items without part numbers, these should be readily available from hardware stores.
- 1, Wiper Motor - the one I use is listed as a 2000-2001 Saturn L series motor (All Electronics P/N DCM-171)
- 1, Sealed Rechargeable Lead Acid Battery - 12 volt, 4 AH (All Electronics P/N GC-124)
- 1, Camera Tripod - Vivitar VPT-120SE Other tripods can be used, but must have a center post of about one inch diameter to fit inside the washers used for mounting. This one also has a ridge about one inch up from the bottom of the post.
- 1, Miniature Snap-action SPDT Lever Switch with 5A contacts (All Electronics P/N SMS-181)
- 1, SPDT Relay with 5A contacts. This relay needs to be small enough to fit in the bracket with room for the arm to swing through. (All Electronics P/N RLY-379)
- 1, Jack 1/4" panel mount with shield pin isolated from the panel when mounted. (All Electronics P/N SPHJ-2)
- 1, Transformer 12V 200mA (All Electronics P/N DCTX-1222)
- 1, Coax jack This mates with the above transformer (All Electronics P/N DCJ-1)
- 1, Coax power plug. This also mates with the above jack. These parts are all dependent on how you wish to connect to and charge the battery. (All Electronics P/N DCSID)
- 2, Plugs 1/4" cable mount. Monaural is fine. Note: One of these connectors will need to mate with your controller. Substitute as appropriate. (All Electronics P/N RAPS)
- 1, ATC type fuse holder (All Electronics P/N FHP-22)
- 1, ATC type 5A fuse (automotive blade type) (All Electronics P/N FSA-5)
- 1, 100 foot roll of 24 AWG speaker wire
- 2, Type 6000D bearings (Automotive or specialty)
- 6, 3/16" crimp type female quick disconnect terminals
- 1, 1.1" piece of 1" copper tubing
- 1, piece of angle aluminum 1/8" thick 2" by 2" by four inches long
- 1, 2 foot piece of Channel Aluminum 25/64" by 1/2" by 1/16" Inside of channel is 1/4" to mount over the ends of the 1/4" bar aluminum. This is sometimes referred to as trim for 1/4" plywood.
- 1, 2 foot piece of flat bar aluminum 1/4" by 3/4" if available (or 1/4" by 1")
- 3, 1" long by 1/4" center plastic standoffs (1/2" outside diameter)
- 3, 1/4" flat washers
- 11, 1/4" lock washers (either split or internal tooth)
- 1, 1/4" internal tooth lock washer
- 3, flat washers with just over 1" center and just over 2 1/2" outside diameter
- 2, M6 by 50mm metric bolts
- 1, M6 by 12mm metric bolt
- 2, SAE 1/4"-20 by 2" long bolts (these must have threads for their entire lengths)
- 1, SAE 1/4"-20 by 3" long bolt (this must have threads its entire length)
- 6, SAE 1/4"-20 nuts
- 2, SAE 3/8" internal tooth lock washers
- 2, SAE 3/8"-16 wing nuts
- 1, SAE 3/8"-16 coupler Note: Test this coupler to ensure it threads totally onto the rod. You may need to rethread.
- 1, SAE 3/8"-16 to 1/4"-20 adapter
- 1, 18 inch SAE 3/8"-16 threaded rod
- 2, SAE 2-56 by 1/4" long screws
- 6, SAE 2-56 nuts
- 4, SAE #2 lock washers
- 2, 8-32 x 1/2" screws (or possibly a little longer)
- 2, 8-32 self-locking nuts
-----------end of list--------------